Ginger is one of my favorite plants, both in the garden and in the kitchen. You can cook with it fresh, candy it, dry it, or turn it into a powder for teas and baked goods. And getting started can be as simple as picking up a good piece of ginger at the grocery store.
The trick to a productive container-grown ginger plant is understanding how it grows. Give it room to spread sideways, rich soil, warmth, and the right amount of moisture, and you’re setting yourself up for a fantastic harvest.
What You'll Learn
- Plant substantial ginger rhizomes with multiple eyes to support faster establishment and more shoots.
- Use a wide container, rich potting mix, and a shallow covering of soil.
- Support active growth with warmth and consistent moisture while avoiding soggy conditions.
- Harvest after several months, then dry slices until crisp before grinding them into powder.
Table of Contents
- Start With a Rhizome, Not a Root
- Choose a Wide Container and Rich Potting Mix
- Plant Ginger Just Below the Soil Surface
- Give Ginger a Warm Start
- Keep Moisture and Nutrition Consistent
- Harvest Some Ginger or Lift the Whole Crop
- Turn Your Harvest Into Homemade Ginger Powder
Start With a Rhizome, Not a Root
We call it ginger root, but the part we plant and harvest is actually a rhizome, a modified underground stem. That distinction matters because the rhizome produces new shoots and expands horizontally beneath the soil.
The established plant I use as an example is Alpinia galanga, often called Thai ginger or galangal. It isn’t the classic culinary ginger, but it illustrates the same general rhizome-growing habit. For a closer botanical look at common culinary ginger, the University of Wisconsin Extension has a useful ginger plant profile.
Choose grocery-store ginger with visible eyes
When you’re shopping for ginger to plant, look for the little growth points, or eyes, on the rhizome. Some may already be starting to sprout. Others will simply look like small buds. Those are the places where new growth can emerge.
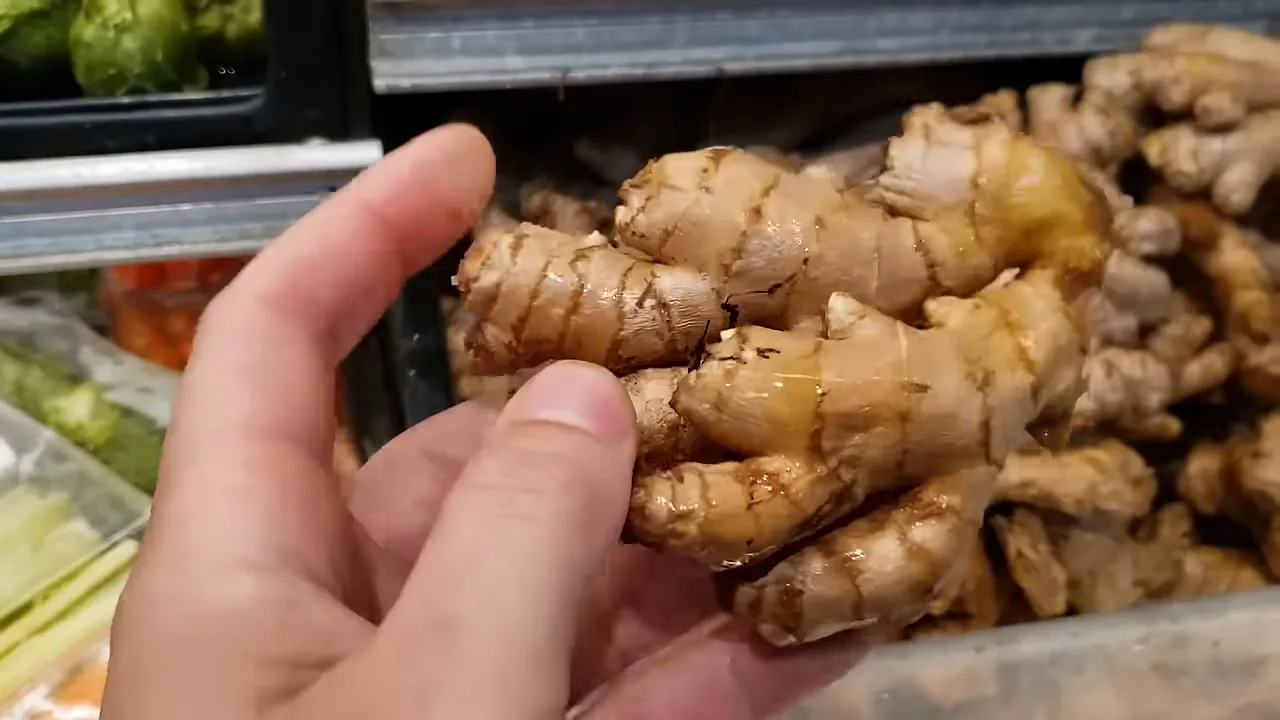
Pick a couple of substantial chunks rather than the smallest pieces you can find. A larger rhizome with more growth points can establish a bigger plant faster.
Think about the difference between planting one little “toe” of ginger and planting an entire branched piece. The small piece may have only a couple of places for shoots to develop. The larger piece has more opportunities to send up shoots.
More shoots mean more leaf area for photosynthesis. That gives the plant more energy to support growth above and below the soil, helping it build a harvest sooner. If your goal is a big ginger harvest, don’t automatically divide your starting material into tiny pieces.
Choose a Wide Container and Rich Potting Mix
As ginger grows, its rhizome creeps sideways and new stalks emerge along that expanding growth. That makes a wide, relatively shallow pot a more sensible choice than a narrow, deep one.
You’re giving the harvestable part of the plant space to spread. A narrow nursery pot can hold an established plant, but I’d consider moving it into a wider container as it grows.
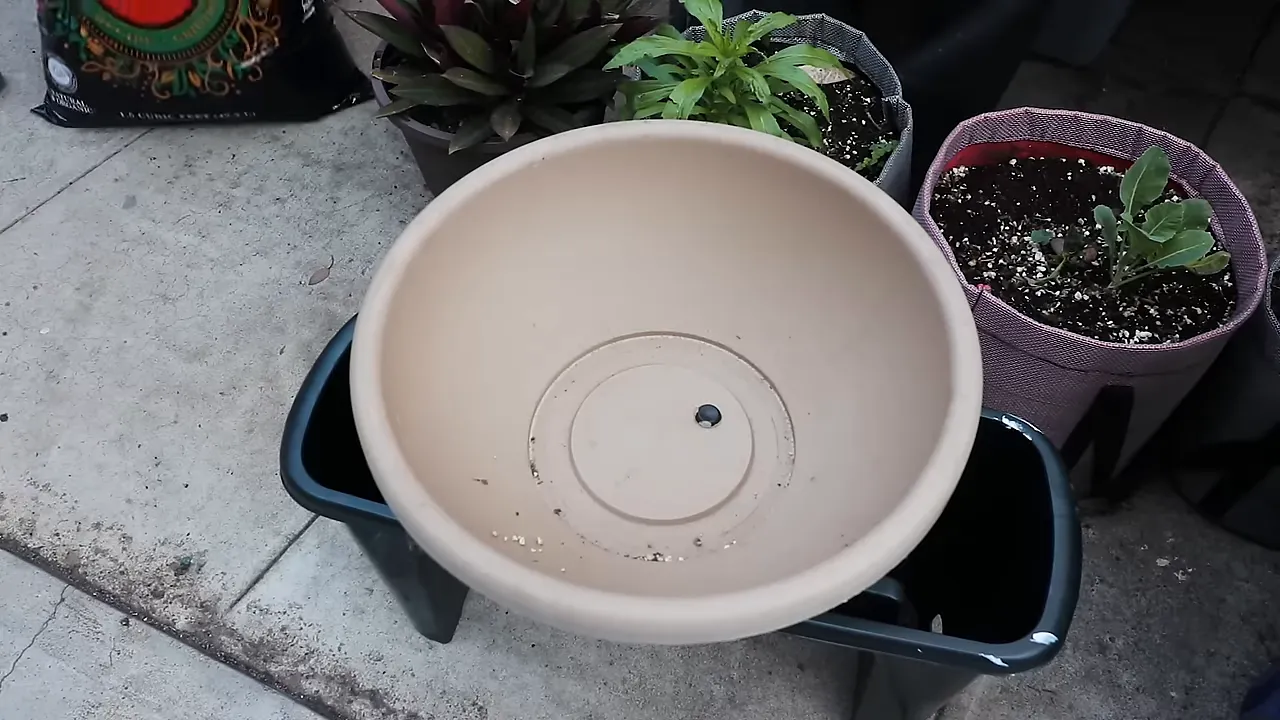
Fill the container with a high-quality potting mix that offers two things:
- A loose texture: The rhizome needs room to creep and expand through the mix.
- Plenty of organic matter: Ginger appreciates a rich growing medium that supports vigorous growth and holds moisture.
The balance matters. You want moisture retention, but you don’t want the rhizome sitting in a soggy container.
Plant Ginger Just Below the Soil Surface
You can pre-sprout ginger in a small bowl of water until you see roots and shoots beginning to develop. But it’s optional. I’m perfectly happy planting the rhizome directly into the potting mix, where that same development can happen.
Here’s the straightforward planting process:
- Fill your wide container with loose, rich potting mix.
- Set the ginger rhizome into the surface and press it gently into place.
- Cover it with about 1/2 to 3/4 inch of potting mix.
- Water lightly to moisten the soil around it.
This is not a crop I bury deeply. The rhizome only needs a light covering of soil.
Go easy on the first watering
A newly planted piece of ginger doesn’t have an established network of roots or a canopy of shoots using water yet. You only need enough moisture to support that first root and shoot development.
After watering, check beneath the surface instead of guessing. In my container, the initial watering moistened roughly the top two inches of mix. A small additional drink was enough to finish the job.
Moist is the goal, not saturated. Don’t keep soaking an unsprouted rhizome simply because ginger is a tropical plant. Pay attention to the mix while you wait for growth.
Give Ginger a Warm Start
To understand what ginger wants, think about its Southeast Asian origins: heat, humidity, rainfall, and soil that stays moist for a good stretch of time.
Spring is a sensible starting point. In cold areas, especially anywhere with a true winter frost, start the container indoors. Let the ginger begin sprouting, then consider moving it outdoors when conditions are warm enough.
Commercial ginger planting is often timed around spring and the approaching rainy season. That lets the climate do much of the work. In a container, we’re trying to provide those same broad conditions ourselves.
The important distinction is between the newly planted rhizome and the actively growing plant. Start with modest watering, then support the growing plant’s greater demand for moisture as roots and shoots develop.
Keep Moisture and Nutrition Consistent
Once ginger is growing well, its care is mostly about keeping conditions steady. This is where paying attention becomes your most useful gardening skill.
Use mulch in dry conditions
If you garden in a particularly dry area, add about one to two inches of wood-chip-style mulch over the potting mix. That layer helps retain moisture so the container doesn’t dry out as quickly.
You may need to replenish it during the growing season. Commercial growers may mulch at planting, lightly hill soil around developing rhizomes, and add more mulch roughly 45 to 90 days later. The underlying idea is the same: protect the rhizomes and conserve moisture.
Read the plant before changing its care
Three common problems give you clues about what needs adjusting:
- Brown leaf tips: These can suggest that the mix isn’t staying moist enough. Check the soil, consider watering more often, and use mulch to slow moisture loss.
- Yellowing foliage: Ginger is a nutrient-loving plant, so yellowing can be a reason to assess its feeding. An organic granular fertilizer or a liquid fertilizer is an option.
- Soggy conditions and rotting rhizomes: These point toward too much water. A moisture-loving plant still needs you to avoid waterlogging its container.
If a pot dries out extremely quickly, consider whether its moisture retention suits your conditions. But don’t solve dry soil by creating a container that stays permanently wet.
And if your ginger flowers? That isn’t automatically a problem. Flowering is part of the plant’s normal behavior, not a sign that you’ve ruined the crop.
Edible gingers can offer fragrant foliage and flowers as well as rhizomes. Because different plants share the ginger name, know which culinary species you’re growing before using those additional parts in the kitchen.
Harvest Some Ginger or Lift the Whole Crop
Plan to give the plant about four to five months before taking a first harvest. A plant with attractive shoots after a couple of months is encouraging, but that doesn’t mean you need to start digging immediately.
Your harvesting approach depends on whether the plant can keep growing where you live.
For a plant that can keep growing
If your climate allows you to overwinter ginger, you can take a little at a time. Carefully access the rhizome and snap off a new chunk while leaving the rest of the plant in place.
That allows you to harvest without lifting and disturbing the entire root and shoot system. The remaining plant can continue growing.
For a crop facing frost
If cold weather is closing in and the plant is going to die back, harvest before frost damages it. In that situation, it makes sense to lift the whole crop rather than leave your harvest outside.
Wash and clean the ginger, then decide what belongs in the kitchen and what you want to save for planting. Rhizomes can be held in a root-cellar-type storage setup for replanting the following spring.
That’s one of the best parts of growing ginger: a harvest can provide both your next kitchen ingredient and your next planting material. For more growing information, our ginger growing guide is a useful companion.
Turn Your Harvest Into Homemade Ginger Powder
I love taking something from the garden and turning it into an ingredient I can reach for in the kitchen. Ginger powder is a great example. Once dried and ground, ginger becomes a versatile seasoning for tea, baking, and other recipes.
1. Wash and slice evenly
Give freshly harvested ginger a good wash and scrub to remove the soil. Then cut it into thin, uniform slices.
Consistency matters more than speed here. Pieces of similar thickness dry at a similar rate. A mix of thick chunks and thin slivers makes it harder to get the whole batch ready together.
2. Arrange the slices in a dehydrator
I use a basic Nesco dehydrator with stackable trays and mesh inserts to support the slices. Spread the ginger out on the trays so the pieces have room around them.
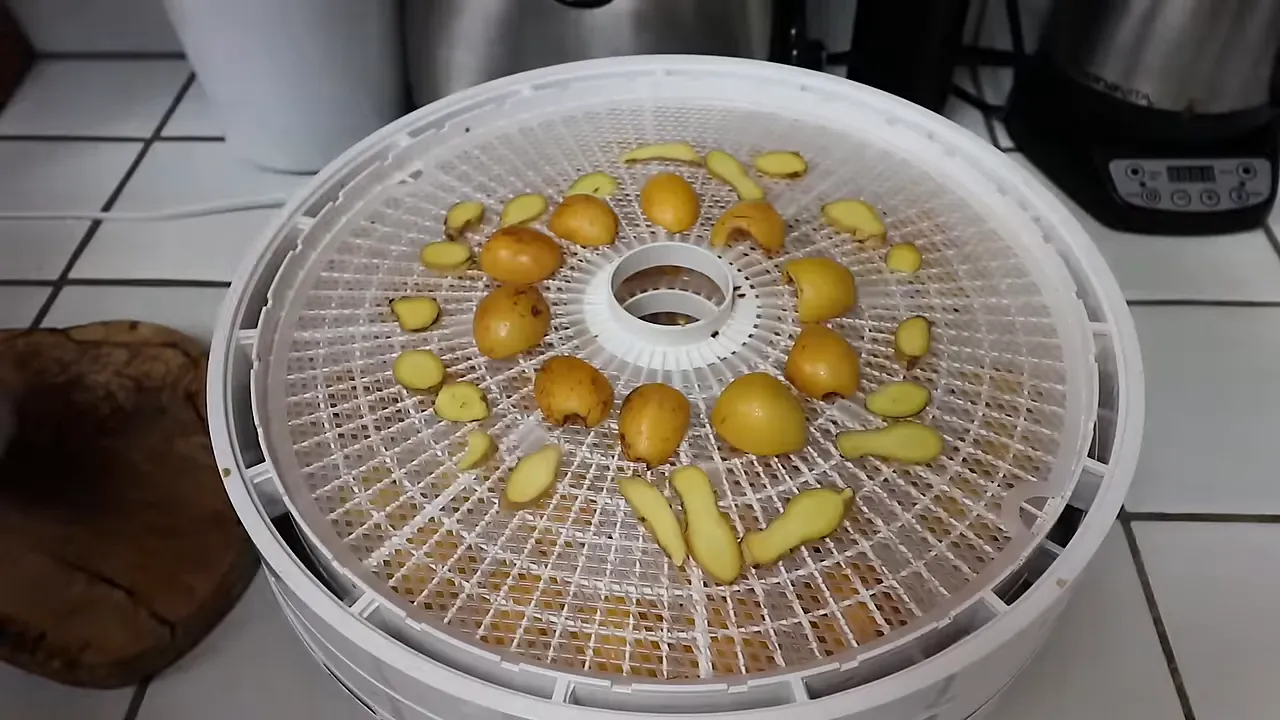
For this batch, I used about 115°F for three to four hours. Treat that as a starting point, not a guarantee that every batch will be finished on the same schedule.
The real test is texture: the ginger should be crisp enough to snap. If it still bends or feels moist, it isn’t ready to become powder.
3. Grind the fully dried ginger
Once dehydrated, the slices will look surprisingly small. Put the crisp pieces into a spice grinder and grind them into a powder. A dedicated spice grinder is convenient, but it isn’t the only tool you can use.
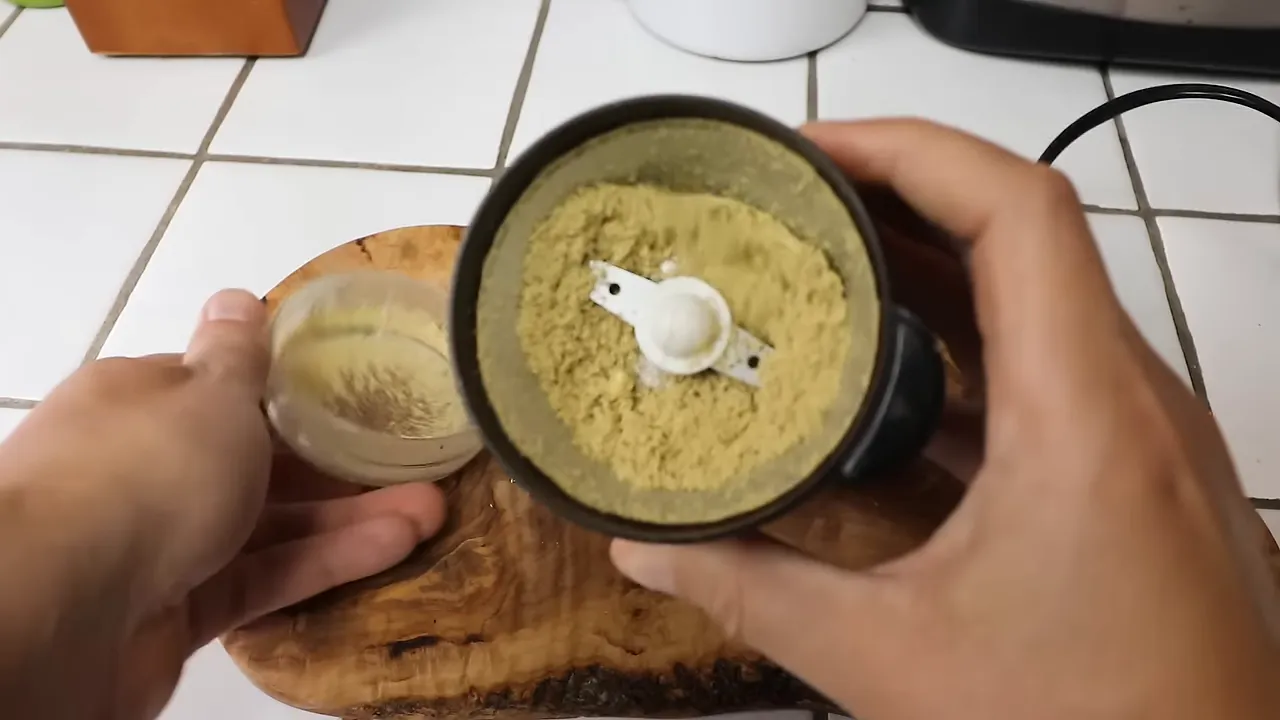
Transfer the finished powder into a spice jar. Now you’ve taken a piece of grocery-store ginger, grown it into a container plant, and turned part of the harvest into a homemade kitchen staple.
Ginger is a genuinely fun plant to grow. Even if your climate doesn’t support an enormous rhizome harvest, its foliage can still make it a lovely ornamental. Give it a warm start, room to spread, and attentive care, and keep on growing.


