Just when you think you’ve heard it all in seed starting, along comes the seed snail. The idea is simple: spread potting mix over a strip of material, roll it up like a cinnamon roll, stand it upright, and plant seeds into the exposed soil at the top.
It promises a lot of seedlings in a small space, often using materials you already have. That’s a pretty appealing pitch for a budget garden. But does it make seed starting easier, or are we making a soil burrito when a tray would do?
We tried four versions using bubble wrap, an old potting soil bag, burlap, and cardboard. All four germinated tomatoes. The surprising part was which material produced the healthiest plants, and what happened when we unrolled them.
Key Takeaways
- Seed snails can start many tomato seedlings in a compact space using repurposed materials.
- Cardboard produced the healthiest-looking plants, but roots grew through it and complicated separation.
- Burlap dried too quickly, while the plastic rolls were easier to keep watered.
- Unrolling and potting up added enough work that we still preferred conventional seed trays.
Table of Contents
- What Is a Seed Snail, and Why Use One?
- The Four Seed Snail Materials We Tested
- How We Made and Planted the Seed Snails
- The Results: Which Seed Snail Worked Best?
- Unrolling the Snails Revealed the Catch
- How We Potted Up the Tomato Seedlings
- Our Verdict: Useful for Some Gardens, Not a Tray Replacement for Us
What Is a Seed Snail, and Why Use One?
A seed snail holds a continuous ribbon of soil between layers of rolled material. From above, you can see the spiral that gives it its name. Seeds go into the soil along that spiral, and the seedlings grow together until you unroll the whole thing and separate them.
The main attractions are straightforward:
- A small footprint: You can fit quite a few seedlings into one compact roll.
- Inexpensive materials: Packaging and other household leftovers can become seed-starting containers.
- Access for transplanting: In theory, unrolling the snail exposes the seedlings so you can separate and pot them up.
We were encouraged to try it after seeing Ben at GrowVeg demonstrate the method and hearing from other gardeners experimenting with it. We normally use cell trays, but there’s no single required way to start a seed. A free method deserves a fair shot.
The important question isn’t just whether seeds sprout. It’s whether the whole process, from assembly through transplanting, is worth the effort.
The Four Seed Snail Materials We Tested
We cut the materials into strips of roughly similar dimensions. We didn’t establish one exact strip size as the ideal. Shorter or taller rolls are possible, as long as the material can roll and hold the soil together.
- Bubble wrap: A popular choice with enough body to support a roll. The air pockets might provide some insulation, although we didn’t measure that.
- An old potting soil bag: Thin, flexible plastic that takes up very little space between soil layers.
- Burlap: A breathable fabric option, but one that raised an immediate concern: would roots grow into the weave?
- Cardboard: Readily available and sturdy enough to stand upright, but potentially vulnerable to getting soggy and breaking down.
For the cardboard, we rolled it without soil first to make it easier to bend during assembly.
Our early bets leaned toward bubble wrap and the old soil bag. Bubble wrap seemed supportive, while the bag offered essentially the same plastic barrier in a much thinner package. Cardboard looked like it could either work beautifully or fall apart. Burlap was the wild card.
How We Made and Planted the Seed Snails
1. Prepare a fine, evenly moist potting mix
We used the same potting mix in every roll: FoxFarm Bush Doctor Coco Loco, a coco coir-based mix. Whatever medium you use, a reasonably fine texture makes it easier to spread an even layer and work with small seeds.
We chose standard potting mix rather than a very free-draining seed-starting mix. Our concern was that a mix with lots of perlite might not wick water effectively through a tall roll. That was a working hypothesis, not a comparison we tested.
The coco coir appealed to us because it absorbs water and can help wick moisture upward.
Pre-moistening matters. We mixed in water until the medium held together when squeezed but wasn’t releasing a bunch of water. Think damp sponge, not dripping sponge. The first squeeze test left too much crumbling soil; after adding water and mixing thoroughly, it held together better.
2. Spread a consistent layer of soil
Lay the strip flat and spread the moist mix over it, bringing the soil to the edge that will become the bottom of the upright roll. You want soil at the base so it can make contact with water and wick moisture upward.
Keep the layer as even as possible. A thick layer makes the roll bulkier and uses up the strip’s length faster, so you get fewer turns in the spiral. There’s no prize for making the fattest snail on the bench.
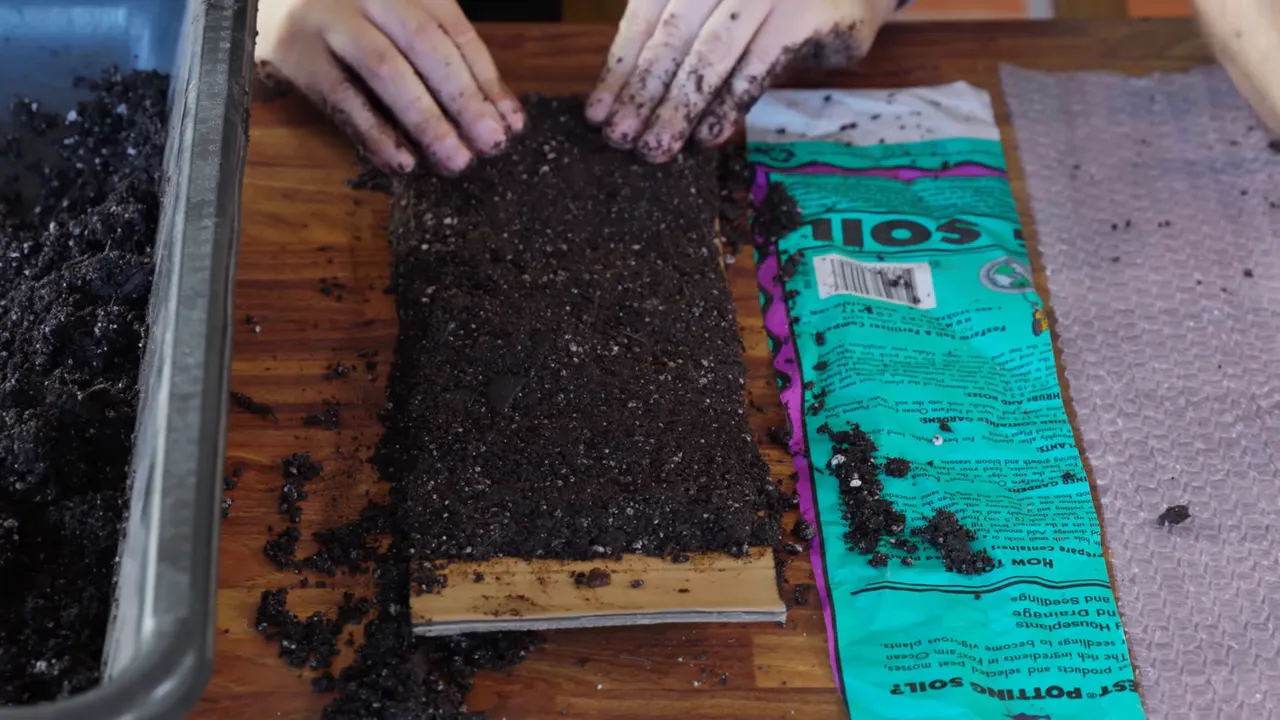
Material thickness also makes a difference. Our thin soil-bag plastic produced about four visible turns, while the thicker cardboard produced only about two. The difference wasn’t simply how much soil we added. The wrapper itself was taking up space.
3. Roll, secure, and settle the soil
Starting at one end, roll the strip and soil together. We secured the rolls with tape, then stood them upright and gently pressed or tapped the soil to settle it.
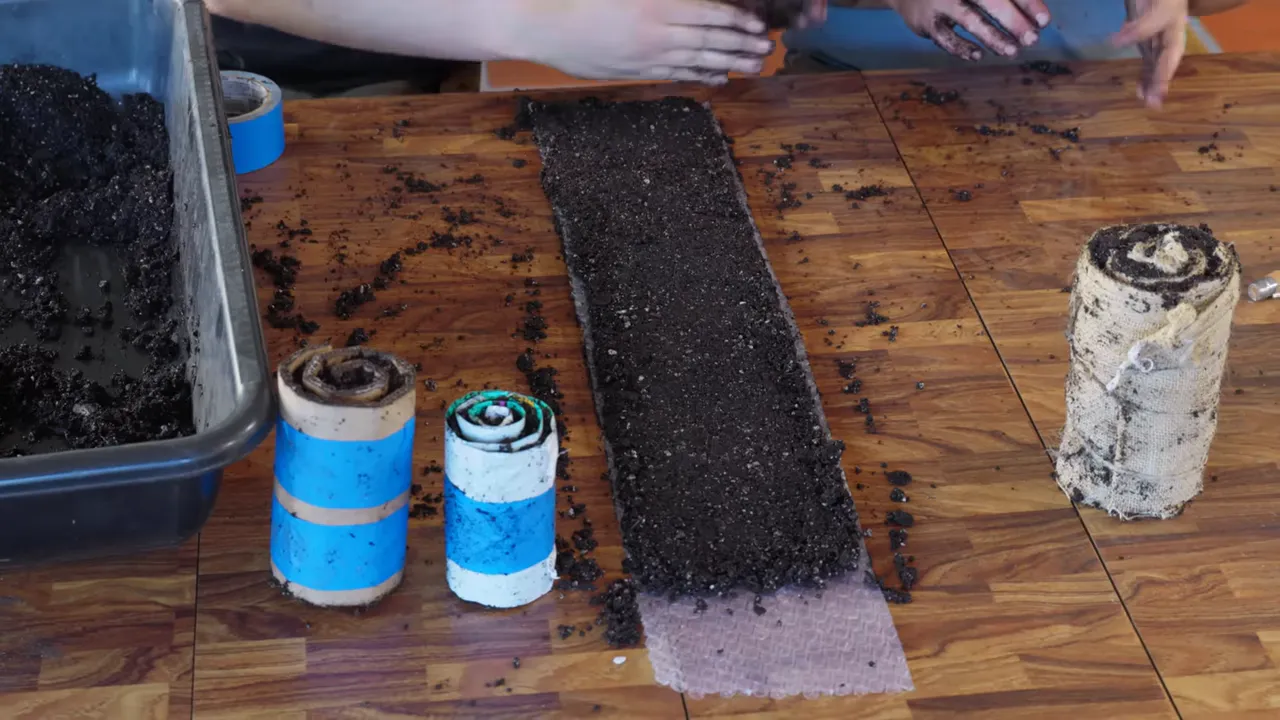
This part took some fiddling. Layers shifted, soil moved, and we experimented with how firmly to compress the rolls. One ended up so tight that getting seeds into the top was difficult. You need a roll that holds together, but you still need room to plant.
We also left an unfilled tail on one strip with the idea that we might later add soil and enlarge the snail. That sounded clever during assembly. After unrolling the seedlings, we were much less convinced that rolling everything back up would be easy.
4. Choose a crop that tolerates root disturbance
We planted ‘Cream Sausage’, a bushy, determinate tomato variety, in all four rolls.
Tomatoes made sense for this experiment because they grow vigorously and tolerate some handling of their roots. They can also be planted deeper when potted up, which gives you flexibility if the seedlings get a little elongated.
We would not choose a crop that strongly dislikes root disturbance for a first attempt. The eventual unrolling and separation are a real part of this method, not an optional extra.
Peas and beans came up as possible future experiments, but we didn’t test them. Our results apply to these tomatoes in these four rolls.
5. Sow along the spiral and lightly cover
We placed seeds into the exposed soil at the top, starting near the center and working around the spiral. Spacing varied from roughly 1 to 2 inches. Then we sprinkled mix over the seeds and gently pressed it down.
Each roll received at least about 12 seeds, and one held 16. Together, the four rolls occupied roughly a quarter of the tray we were using. That’s a lot of potential tomato seedlings in a small area.
Still, sowing density alone doesn’t prove a method is better. You can sow a lot of seeds in a conventional container, too. The useful comparison is how well those seedlings grow and how easily you can move them into their next home.
The moist mix gave the seeds a starting supply of water. The rolls could also be watered from above or take up moisture from below. During the growing period, the plastic versions were reasonably easy to keep watered. Burlap was another story.
The Results: Which Seed Snail Worked Best?
After a few weeks, we had seedlings in every material, but the differences were obvious.
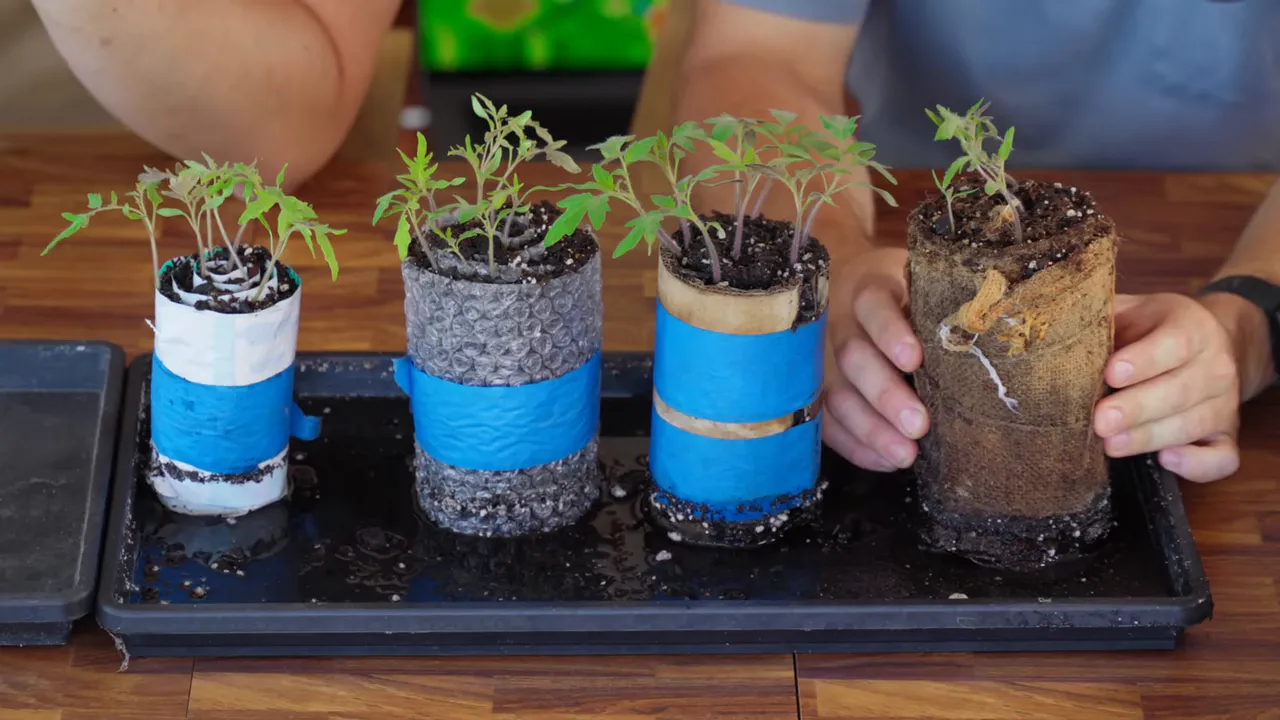
Before getting into the results, one important limitation: we did not sow exactly the same number of seeds in each roll, and the rolls weren’t identical in size. These counts are observations, not a controlled germination-rate comparison. Plant color, stem thickness, moisture management, and ease of handling mattered more to our verdict.
Burlap: Too much drying for too little reward
The burlap roll had around four sprouts, with one weak enough that we would barely count it. The remaining seedlings didn’t look as healthy as those in the other materials.
The biggest problem was moisture. The outside of the roll dried very quickly, and the seedlings that emerged were concentrated toward the middle.
We had initially worried about roots tangling in the fabric, but drying became the immediate issue. More frequent watering might have helped. However, if the appeal is an easy, relatively hands-off seed-starting system, constantly chasing moisture around the outside is not much of a selling point.
Bubble wrap: Healthy seedlings, but not the winner
We counted about seven seedlings in the bubble-wrap roll. They looked reasonably healthy, and we weren’t unhappy with the result.
There were still gaps toward the outside edge, suggesting that moisture loss may have affected germination there, too.
We also wondered whether the clear plastic had allowed the exterior soil to heat up. That remained speculation. We didn’t measure temperatures, and we couldn’t establish whether the bubble wrap’s possible insulation made a meaningful difference.
Old potting soil bag: Compact and workable
The soil-bag roll produced around six surviving seedlings and performed fairly similarly to bubble wrap. Its biggest advantage was its small footprint.
We noticed a seedling that appeared to have succumbed to damping off, with another tiny sprout possibly lost as well. Damping off damages young seedlings around the soil line. The University of Minnesota Extension’s guide to damping off is a useful reference for recognizing and preventing the problem.
The thin bag material made a particularly compact snail, and watering wasn’t difficult to maintain. If we were experimenting with this method again, starting with smaller rolls would make more sense than building a giant one right away.
Cardboard: The healthiest top growth
Cardboard was our surprise winner for plant appearance. We counted about eight seedlings, but the count wasn’t the most convincing part.
These tomatoes had the lushest green growth and the most consistently thick, sturdy stems. Some seedlings in the other rolls looked thinner or more elongated. The cardboard plants simply looked better.
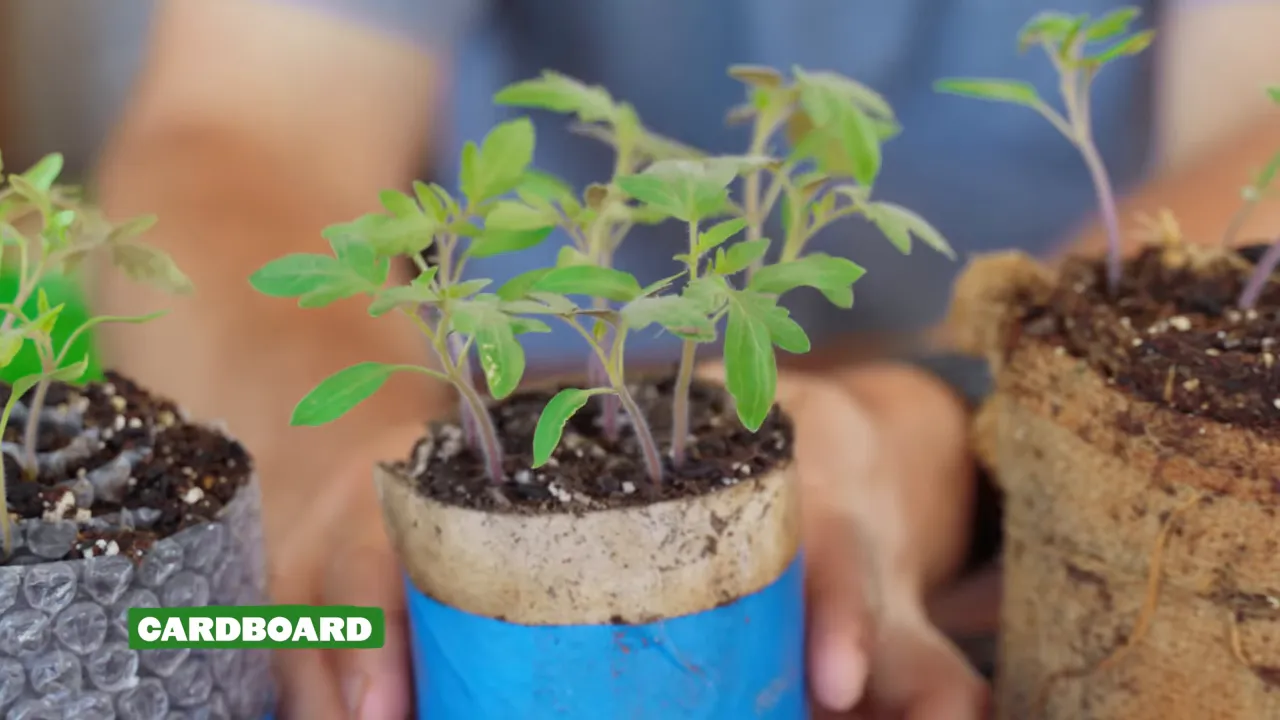
Our theory was that cardboard provided a useful balance between the extremes of burlap and plastic. It retained moisture while remaining porous, and the corrugation might have contributed some insulation and air movement.
That explanation fits what we observed, but we didn’t measure aeration, nutrient uptake, or moisture levels. What we could confidently say was that, with the same soil mix, the cardboard roll produced the healthiest-looking tops.
Then we opened it.
Unrolling the Snails Revealed the Catch
Healthy leaves are only part of the job. At some point, those seedlings need to leave the roll.
We cut the tape on the cardboard snail, laid it on its side, and began unrolling it over a tray. The cardboard had softened and partly broken down. More importantly, some roots had grown through it.
Instead of a clean separator between soil layers, we now had roots attached to a deteriorating wrapper. Peeling it away took some root tissue with it, even when we worked carefully.
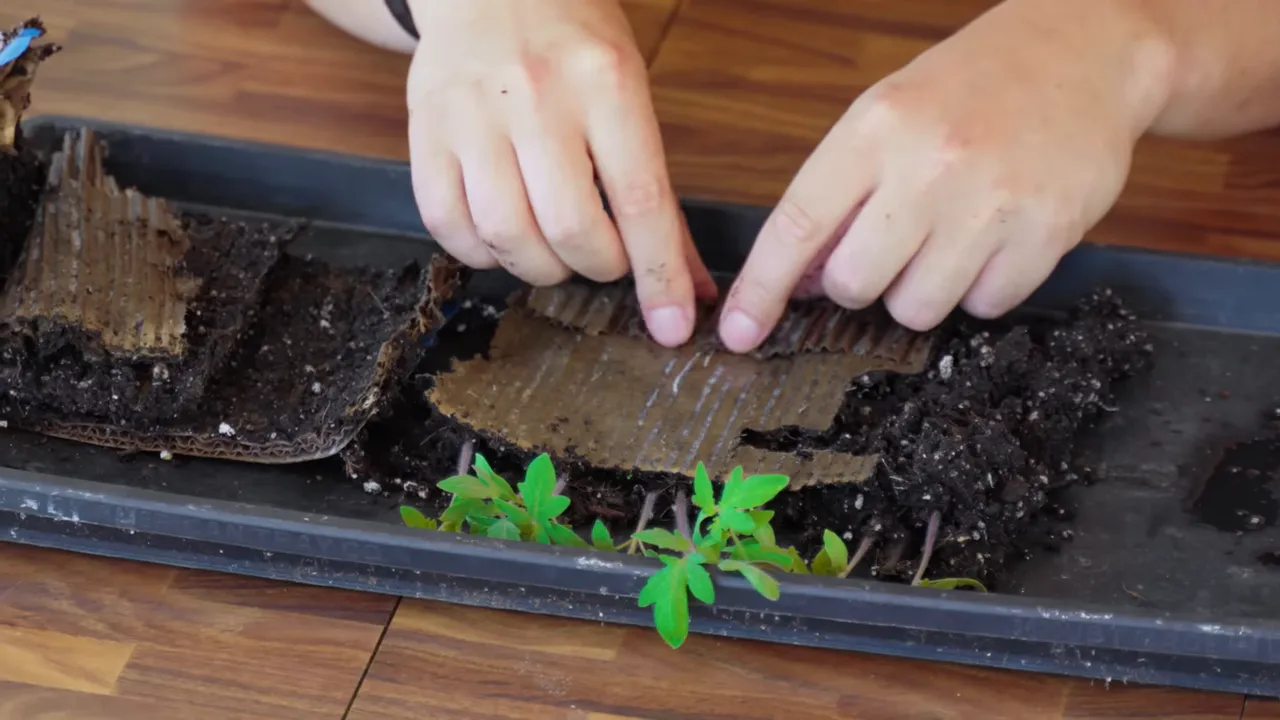
That raised another possible explanation for the healthy plants: perhaps roots had crossed the cardboard and accessed soil in neighboring layers. We couldn’t confirm how much that contributed, but the roots clearly hadn’t stayed neatly confined.
Once separated, the root systems were smaller than we expected given how good the tops looked. We weren’t pulling out dense, well-knit root balls.
The plastic soil-bag roll stayed more intact during unrolling and was easier to remove from the soil. We weren’t perfectly graceful with it, either, but the wrapper itself wasn’t breaking apart or catching roots in the same way.
Even so, the individual seedlings didn’t have dramatically better root systems. We could lift out small nursery-style plugs, but not the consolidated root balls we prefer for moving plants onward.
Cardboard won for top growth, but plastic was easier to take apart. There wasn’t one material that neatly won every stage.
How We Potted Up the Tomato Seedlings
At this stage, our tomatoes still needed potting up rather than going straight into the garden.
We used the same potting mix as before and moved the separated seedlings into individual cells. There were two straightforward ways to do it:
- Hold the seedling in place and fill around it. Support the small soil plug at the desired depth, then add mix around it.
- Fill the cell and make a planting hole. Use a finger to create enough space, then lower the seedling and its roots into the hole.
For these tomatoes, we preferred setting them a little lower so more of the stem was buried. Then we gently settled the mix around each plant.
The seedlings were usable, and several looked very healthy. But this step also clarified what the seed snail had accomplished: it had given us a compact place to germinate and begin growing seedlings. It hadn’t eliminated the work of separating and potting them up.
Our Verdict: Useful for Some Gardens, Not a Tray Replacement for Us
The seed snail technique works. We started tomato seedlings in all four materials, and the cardboard version produced genuinely good-looking plants.
There are reasonable situations where it could be useful:
- You want to start seeds with materials you already have.
- Your initial seed-starting space is limited.
- You’re growing something tolerant of root handling, such as the tomatoes we tested.
- You’re happy to separate seedlings and pot them up afterward.
But for our own routine, the reward didn’t clearly outweigh the extra work. Cutting strips, spreading soil, rolling, securing, unrolling, and separating plants felt more cumbersome than filling a tray and sowing seeds.
We’ve seen variations that put cardboard inside a layer of plastic to reduce disintegration. We’ve also seen gardeners add soil and enlarge the rolls as plants grow. Those ideas may address particular problems, but they add more handling. After opening our rolls, we weren’t eager to rebuild them around a group of seedlings.
Cell trays also help us stay organized. Each plant has a defined space, and we prefer transplanting a seedling whose roots hold its soil together. This isn’t about needing one particular brand of tray. Use the tray or container that works for you.
If the goal is simply dense sowing in a small area, another option is to sow into a shared tray of mix and prick the seedlings out later. That also involves root handling, but skips the rolling process.
So our verdict wasn’t quite unanimous: one of us landed on “maybe, for a particular use,” and the other on “not for my garden.” Neither of us found a compelling reason to replace our normal seed-starting setup.
Try a seed snail if the low material cost and compact footprint solve a real problem for you. Just judge it through transplanting, not only by the first flush of green leaves. Getting a seed to sprout is a success. Getting it into its next container without unnecessary fuss is part of the success, too.


